
Overview
CanShield VP is a vapour permeable, self-adhered water-resistive air barrier membrane that protects the building envelope by allowing vapour to pass through (breathable) but not air or liquid water.
Designed for commercial and residential construction applications, CanShield VP creates a water-resistive air barrier when applied outside of the wall sheathing and behind the exterior wall cladding. Used for transitions, rough openings, fenestrations, and full-wall applications.
CanShield VP consists of multiple layers of spun-bonded polypropylene fabric with a specially formulated adhesive that firmly grips to substrates.
Installation Best Practices
CanShield VP installation layout should be planned prior to application to minimize waste, this process will assist locating penetrations that will need to be correctly detailed to ensure a weather and airtight installation.
- During the installation process, CanShield VP must be protected at the leading edge to ensure liquid water does not travel behind the membrane.
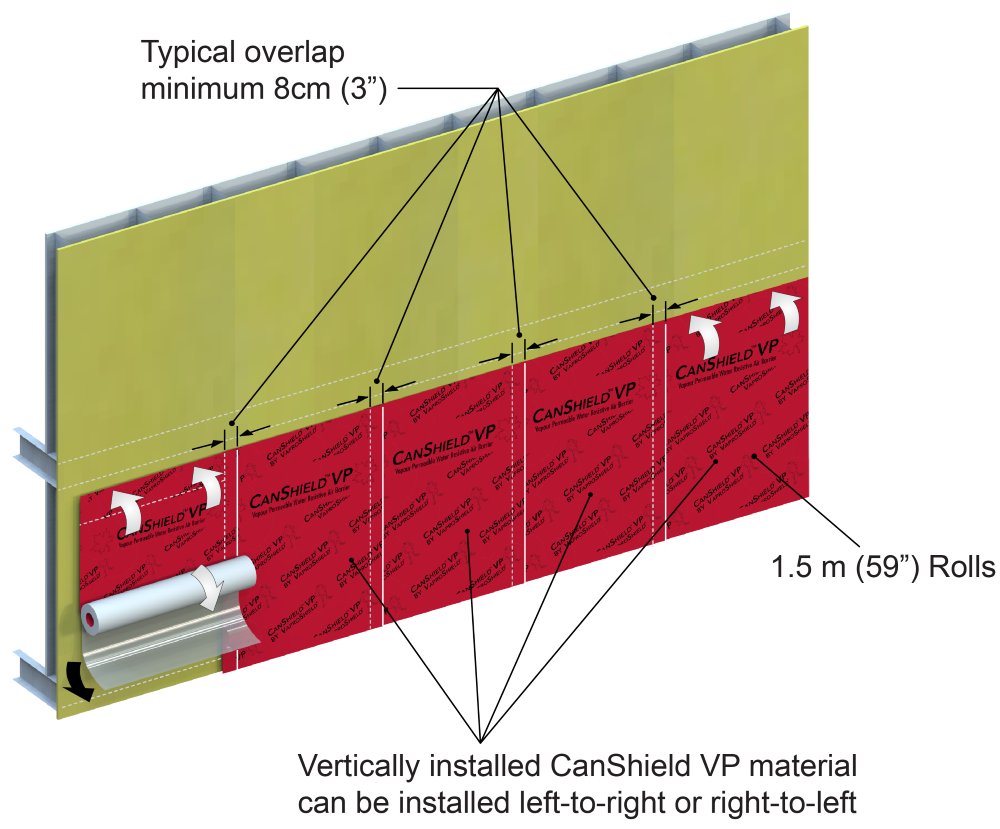
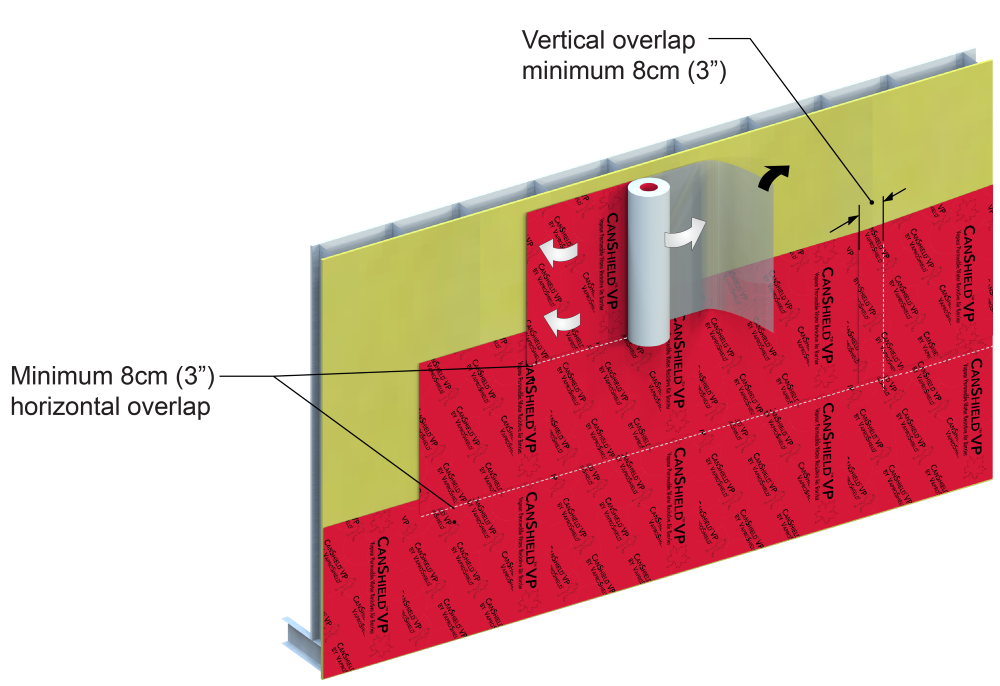
- CanShield VP can be installed in a vertical or horizontal direction.
- Membrane is easily cut to size with basic hand tools.
- Always install in a “weatherboard or shingle fashion” with the upper courses lapped over the lower courses
- All penetrations including windows and doors must be installed in proper sequence to ensure a “weatherboard or shingle fashion” end result.
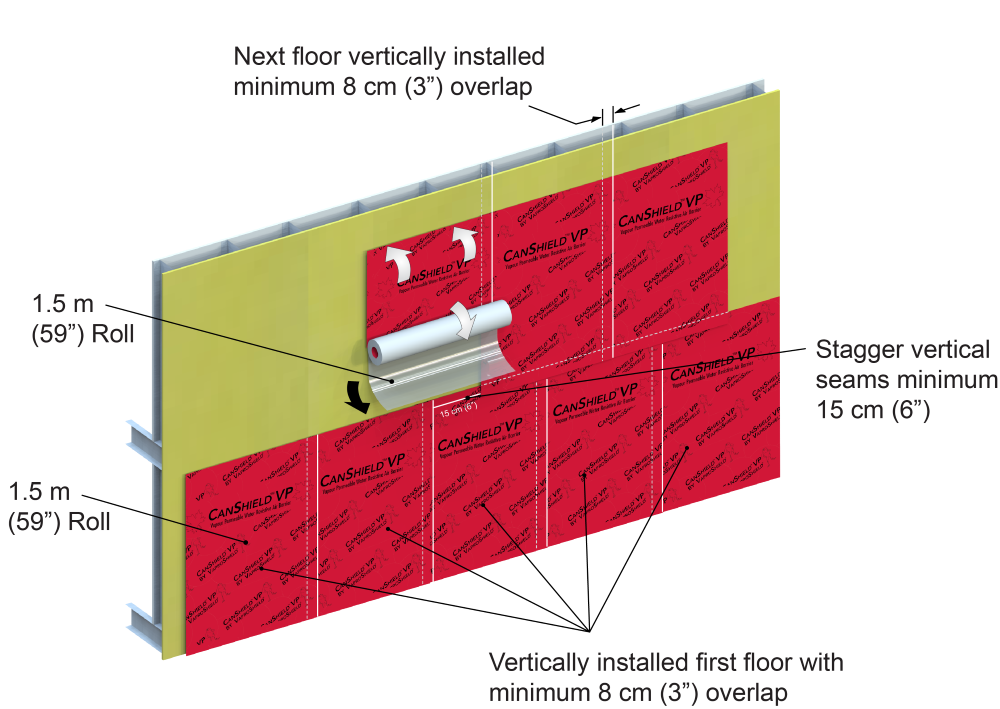
- When a seam is required within 61cm (24”) of an inside and outside vertical corner, the overlap should be minimum 15cm (6”).
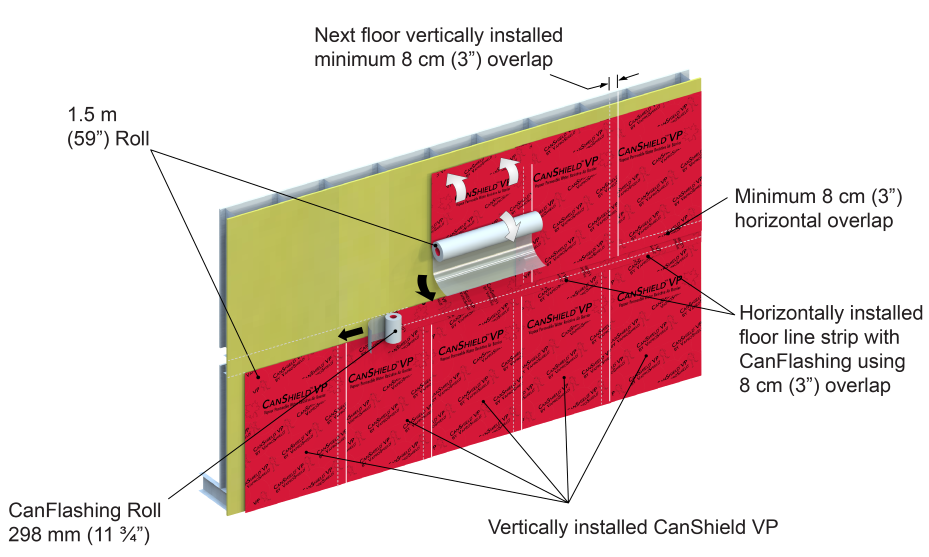
- Vertical seams should be staggered from floor-to-floor, or separated by a CanFlashing horizontally applied strip.
- Roll membrane with two-handed roller to ensure proper adhesion to substrate.
- If desired adhesion is not attained between membranes due to site conditions, VaproShield recommends applying a bead of VaproBond as an additional solution to pressure rolling.
Sustains a maximum six (6) months (180) days UV and climate exposure prior to cladding installation.
Storage
Store rolls on end, on original pallets or elevated platform. Protect from weather or store in an enclosed area not subject to heat over 49 °C (120 °F).
Substrate Information
All surfaces must be dry, sound, clean, “as new” condition, and free of oil, grease, dirt, excess mortar or other contaminants detrimental to the adhesion of the water resistive air barrier membrane and flashings.
CanShield VP is installed on most substrates without primer. Specific jobsite conditions may require additional surface preparation with primer, contact VaproShield Technical.
Substrate surface must be dry to the touch with the ambient temperature above -6.6°C (20°F).
In cold weather, it is recommended to warm rolls to 10°C (50°F) or above prior to application to assure adhesion to substrate.
Substrates
- Exterior Gypsum Sheathing
- Brick
- Rigid Insulation
- Plywood
- OSB
- Metal (Steel, Aluminum)
- Concrete
- Fiberglass Window and Door Frames
Adhesive Curing Time
Normal curing time is approx. 6 hours.
Full adhesion will vary depending on job site weather conditions.
Floor Line Movement
Buildings are designed to accommodate thermal and seismic movement.
CanShield VP must be installed to allow this movement throughout the life of the structure.
To accommodate floor-line movement: Limit coverage area to a single floor and shingle subsequent layers over the top leading edge.
Penetrations
Window and door penetrations can be detailed pre or post-installation of the field membrane. Always ensure shingle fashion result is achieved.
Original Packaging Functions as Dispenser
- Keep CanShield VP in original packaging carefully lift one end of the product out of the box and slide the plastic wrap toward the opposite end.
- Insert roll into end.
- Replace the roll in the box/dispenser and carefully remove the tape in the middle of the roll.
- Keep plastic roll cover to protect partial rolls during installation.
Manageable Lengths
Pre-cut material into individual manageable lengths by pulling material off the main roll to desired length.
Cut material square to the factory edges.
Re-roll material same direction it came off the roll, with the release film outward.
Cut material to desired length with extended blade razor knife.
Single Worker vs. Two Worker Installation
Using the material at its full width, 1.5 m (59”), vertical installation can be easily accomplished by a single worker.
Horizontal installation of the full width material is best accomplished by two workers.
Partial width rolls are easily installed by a single worker.
View details of installation sequence here.
Best Practice Installation Sequence
- Snap a level chalk line for guidance
- Pre-cut material to desired length
- Roll material with release film facing OUTWARD
- Starting at a corner of the roll, peel back approx. 15 cm (6”) of release film
- Cut the release film with razor knife and tear the cut portion of the release film exposing approx. 15 cm (6”) of adhesive surface
- Using hand pressure, lightly apply the exposed adhesive surface to the substrate
- Starting in the middle, use your hands to smooth out air bubbles, releasing the air to each side
- APPLIES ONLY TO VERTICAL INSTALLATION - Allow the rolled up material to drop down the wall, with the remainder of the release film still attached, checking for proper alignment
- When aligned, apply heavy hand pressure across the entire adhered section
- Roll up the material with release film facing OUTWARD
- Slowly pull the release film down the wall, allowing the rolled up material to unfurl
- Lightly smooth out air bubbles with wallpaper trowel
- Continue until all the release film has been removed
- Pull back and reposition material (if necessary) as it unfurls
- Use a hand roller to ensure adhesion
- Install next section, ensuring a 8 cm (3”) minimum overlap to the adjoining material, always in a shingle fashion
Installation Tips
- Avoid scoring the membrane at locations where the material overlaps onto the adjacent piece.
- Allow the top layer of material to span across the underlying layer without attempting to force the material into a 90° bend.
- Avoid stretching the material during installation at inside and outside corners.
- A full 15 cm (6”) overlap in either direction is recommended vertically at inside and outside corners.
|
Vertical Installation
|
Multi-Floor Vertical Overlap
|
|
Vertical Installation Horizontal Floor Line
|
Horizontal Installation
|